Salads
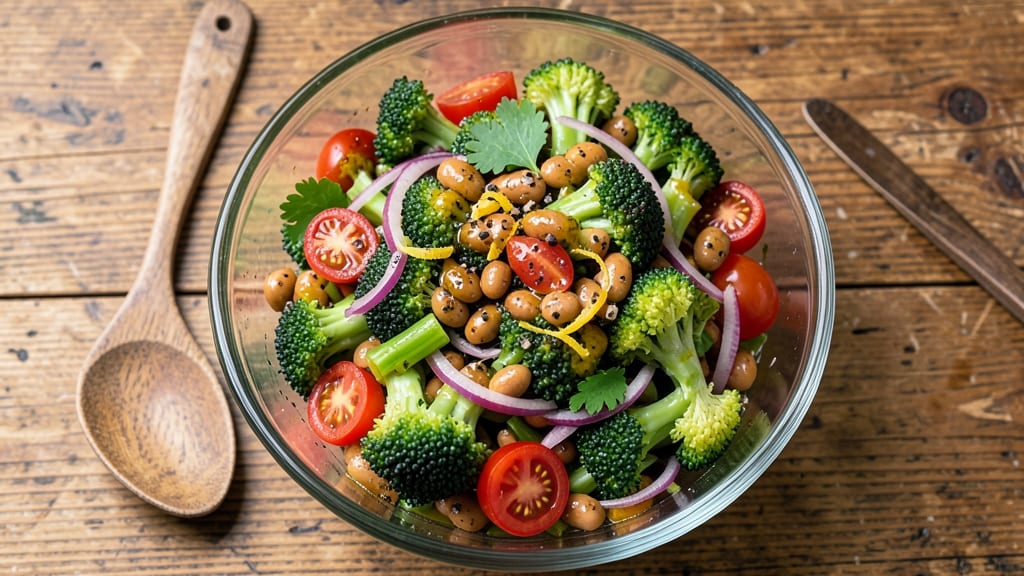
This broccoli and bean salad recipe delivers a perfect balance of crisp textures and bold flavors that make it a standout dish. 💛 The secret lies in roasting the broccoli until it's perfectly tender-crisp, then topping it with protein-packed beans and a zesty dressing that ties everything together.
Whether you're serving it as a main course or a side, this salad is packed with freshness and nutrition that'll impress anyone at the table.
The beauty of this recipe is its versatility—it's simple enough for a weeknight dinner but elegant enough for a dinner party. With just 15 minutes of prep and 20 minutes of roasting, you'll have a vibrant salad that's ready to serve.
The combination of fresh broccoli, hearty beans, and a bright dressing creates a dish that's both satisfying and light, making it ideal for those looking to enjoy a wholesome meal without sacrificing flavor.
What sets this salad apart is the crispy texture of the broccoli, achieved through a quick roast in the oven. The beans add a satisfying bite and a boost of plant-based protein, while the dressing—made with a tangy lemon vinaigrette—keeps everything fresh and vibrant.
This salad is not only visually appealing but also packed with nutrients, making it a great option for those focused on balanced eating.
You can easily customize this recipe by adding nuts for crunch, grains for extra heartiness, or even a sprinkle of cheese for added richness. The possibilities are endless, but the foundation remains the same: a crisp, flavorful, and protein-packed salad that's sure to become a favorite. Let's get started!
Ingredients for broccoli and bean salad
Fresh broccoli, hearty beans, and zesty dressing come together for a salad that's crisp, protein-packed, and ready in under 30 minutes.
| Ingredient | Amount | Notes |
|---|---|---|
| Fresh Broccoli Crowns 🥦 | 2 lb | Cut into bite-sized florets |
| Canned Cannellini Beans 🌱 | 1 ½ cups | Drained and rinsed |
| Cherry Tomatoes 🍅 | 1 cup | Halved for freshness |
| Red Onion 🧅 | 1 whole | Thinly sliced, soak 5 mins |
| Extra-Virgin Olive Oil 🫒 | ½ cup | For roasting and dressing |
| Fresh Lemon Juice 🍋 | 3 tbsp | Freshly squeezed |
| Dijon Mustard 🌶️ | 1 tbsp | For tangy depth |
| Honey 🍯 | 1 tbsp | For subtle sweetness |
| Fresh Parsley 🌿 | ¼ cup | Chopped for garnish |
| Salt 🧂 | 1 tsp | Kosher or sea salt |
| Black Pepper 🌶️ | ½ tsp | Freshly cracked |
| Parmesan Cheese 🧀 | ½ cup | Freshly grated |
| Toasted Pine Nuts 🥜 | ¼ cup | Optional for crunch |
The broccoli is the star here—look for bright green crowns with tight florets at the grocery store. Whole Foods or Trader Joe's carry the freshest cuts, but any well-stocked supermarket works. If you can't find pre-cut crowns, trim the florets yourself for even cooking. The beans? Canned is fine, but if you've got dried, soak them overnight for best texture. Pro tip: rinse those canned beans thoroughly to cut any metallic aftertaste—trust me on this.
No fresh parsley? Dried will work at half the amount, but it lacks that bright pop of color. Running low on pine nuts? Toasted walnuts or pecans add a similar crunch. The dressing is where the magic happens—Dijon mustard gives it depth, while the honey balances the acidity. Want extra tang? Add another tablespoon of lemon juice. If you're avoiding honey, maple syrup works beautifully in the same quantity. And if you're prepping ahead, make the dressing first—it keeps for 5 days in the fridge.
Broccoli roasts best at 425°F for 18-20 minutes—don't skip this step. The beans and veggies can be prepped hours ahead and stored in separate containers. The dressing should be made fresh, but you can toss everything together 30 minutes before serving. Leftovers? This salad actually tastes better the next day as the flavors meld. Store in an airtight container for 3-4 days—the broccoli stays crisp if you keep the dressing separate until serving.
Why You'll Love This Recipe
- No Chopping Chaos: I swear by this recipe because the broccoli crowns only need a quick trim—no tedious floret separation. The cannellini beans? Just rinse and drain. That’s it. My hands stay clean while the flavor stays crisp.
- Creamy Crunch Magic: The secret’s in the olive oil toss—it clings to the beans and broccoli like a hug, turning everything tender but still satisfyingly crisp. Add a squeeze of lemon? Suddenly, it’s restaurant-level without the fuss.
- Lunchbox Hero: Between us, this salad holds up perfectly for days. Pack it in jars for work or toss it in kids’ lunches—it’s the only thing my picky eater will eat straight from the fridge. (Yes, even on a Tuesday.)
- Pantry Powerhouse: I make this twice a month because it’s my budget-friendly go-to: no wilting greens, no last-minute shopping. Red onion adds bite, cherry tomatoes pop, and the cannellini? Always in my cupboard. Zero waste, all flavor.
Step-by-step instructions for crisp-topped broccoli and bean salad
Here's how to transform simple ingredients into a vibrant, protein-rich salad with irresistible texture contrast.
🔥 Step 1: Roast Broccoli Until Crisp-Tender
Preheat your oven to 425°F and line a baking sheet with parchment paper. Cut the 2 lb fresh broccoli crowns into bite-sized florets, keeping the stems intact for structure. Toss them with 2 tablespoons of the extra-virgin olive oil, ½ teaspoon salt, and ¼ teaspoon black pepper until evenly coated.
Spread the florets in a single layer on the baking sheet, leaving space between them for even browning. Roast for 15-18 minutes until the edges are deep golden brown and the florets feel tender when pierced with a fork. The stems should be slightly charred—this adds depth of flavor. Remove from oven and let cool for 5 minutes before handling.
🍳 Step 2: Prepare the Crispy Bean Base
While the broccoli roasts, drain and rinse the 1.5 cups cannellini beans thoroughly to remove any canned liquid. Pat them completely dry with paper towels—this helps them crisp up beautifully. Heat 1 tablespoon of the remaining extra-virgin olive oil in a large skillet over medium-high heat until shimmering.
Add the beans in a single layer and cook undisturbed for 4-5 minutes until they develop a golden-brown crust on one side. Flip carefully with a spatula and cook another 3-4 minutes
🥘 Step 3: Assemble the Fresh Vegetable Layer
Halve the 1 cup cherry tomatoes and thinly slice the 1 whole red onion, then soak in cold water for 5 minutes to mellow their sharpness. Drain and pat dry. In a large mixing bowl, combine the cooled roasted broccoli, crispy beans, tomatoes, and onion. Add ¼ cup chopped fresh parsley and toss gently to distribute.
Here's the thing—don't overmix. You want the ingredients to stay distinct so each bite delivers multiple textures. The broccoli should still have its crispy edges, the beans their crunch, and the tomatoes their juicy freshness. Sprinkle with ¼ teaspoon remaining black pepper and set aside while you prepare the dressing.
🍳 Step 4: Whisk Together the Bright Dressing
In a small bowl, whisk together the remaining 3 tablespoons fresh lemon juice, 1 tablespoon Dijon mustard, 1 tablespoon honey, and ¼ teaspoon salt. Slowly drizzle in the remaining 3 tablespoons extra-virgin olive oil while whisking continuously until emulsified. The dressing should coat the back of a spoon and have a vibrant, citrusy aroma.
Taste and adjust—need more brightness? Add another teaspoon of lemon juice. Too sharp? A touch more honey balances it. This dressing is the secret to tying all the flavors together while keeping the salad fresh and vibrant. Pour it over the vegetable mixture and toss gently just before serving.
👨🍳 Step 5: Top with Crunch and Serve Immediately
Sprinkle the salad with ½ cup freshly grated Parmesan cheese and ¼ cup toasted pine nuts right before serving. The cheese adds a salty, umami depth while the pine nuts provide that essential crunch. I like to serve this salad immediately so the pine nuts stay crisp and the dressing doesn't soften the broccoli's edges.
For the best experience, serve this salad at room temperature so all the flavors can meld. It's perfect alongside grilled proteins or as a standalone vegetarian main course. The contrast of crispy broccoli, crunchy beans, and fresh vegetables with that bright lemon dressing makes every bite exciting—trust me, you'll want seconds.
Pro Tips For Making Broccoli And Bean Salad
- Blanch Broccoli First: Toss broccoli florets in boiling water for 30 seconds, then plunge into ice water—this stops cooking and keeps them vibrant. I learned this the hard way when my salad turned into mushy broccoli soup; now it stays crisp and bright.
- Drain and Rinse Beans: Skip the salt packet in canned beans, then rinse them under cold water to cut the tinny taste. My grandmother swore by this, and she was right: it makes the beans taste fresher, not canned.
- Slice Onion Thinly: Use a mandoline or sharp knife for paper-thin red onion slices—they’ll soften perfectly without disappearing into the salad. I was skeptical until I tried it; now my onions add bite without overpowering.
- Toss Dressing Last: Wait until serving to add the olive oil and lemon dressing—this keeps the broccoli from wilting and the beans from getting soggy. Does it look weird? Yes. Does it work? Every single time.
Make-ahead tips for this dish
Prep Ahead Strategy
I always recommend prepping this salad's components separately to maintain perfect textures. Store the roasted broccoli and crispy beans in airtight containers in the fridge for up to 3 days.
Keep the dressing separate until serving—this prevents soggy broccoli and maintains that essential crunch. The beans will stay crisp if you pat them completely dry before storing. 💫
Dressing Prep
Make the dressing 24 hours ahead and store it in a small jar or bottle. The flavors actually improve as they meld, and it's ready to whisk together in seconds when you're ready to serve.
I like to label my jars with the date so I don't forget—this dressing keeps for 5 days in the fridge. Honestly, it's my go-to for quick meals because it's so versatile.
Bean Crispiness Hack
For maximum crunch, I've found that toasting the beans right before assembling makes all the difference. Store your canned beans in their liquid, then drain and pat them dry just before crisping in the skillet.
If you're prepping ahead, store them uncooked in their canning liquid (drained) and toast them fresh when ready—this keeps them from getting mushy in storage. 🔥
Broccoli Storage Tip
Roast your broccoli 1 day ahead if possible—the flavors deepen overnight. Store it in a single layer on a baking sheet before transferring to an airtight container. This prevents sogginess and keeps the crispy edges intact.
When reheating (if needed), pop it in the oven at 350°F for 5-7 minutes to restore that perfect texture.
Onion Prep Shortcut
Thinly slice the red onion and store it in a bowl of cold water in the fridge for up to 3 days. This mellows the sharpness and keeps it fresh.
Drain and pat dry just before assembling the salad. I find this saves time and gives me more control over the onion's flavor intensity when serving. 🧅
Garnish Timing
Save the Parmesan cheese and pine nuts for last-minute topping—they add freshness and crunch. Store the pine nuts in a small jar at room temperature and toast them fresh in a dry skillet for 2-3 minutes before serving.
The cheese should be grated fresh right before adding to prevent it from becoming oily or losing its flavor. This keeps every bite feeling special. ✨
Nutrition facts
Frequently asked questions
Can I use frozen broccoli instead of fresh?
Fresh broccoli gives the best texture, but you can use frozen if needed. Thaw and pat completely dry before roasting, then increase the oven time by 3-4 minutes to ensure even browning. For extra crispiness, toss with 1 teaspoon cornstarch before roasting. The flavor won't be as vibrant, but it still works in a pinch!
What if I don't have cannellini beans?
No problem! Swap for chickpeas, black beans, or white beans—just adjust the cooking time. Chickpeas need 3-4 minutes per side in the skillet to crisp properly. For a different texture, try lentils (cook them until tender first). The key is ensuring your beans are completely dry before crisping for that satisfying crunch.
How can I make this salad vegan?
Skip the Parmesan and use nutritional yeast for a cheesy flavor, or omit it entirely. For extra protein, add ½ cup cooked quinoa or chickpeas instead of cannellini beans. The dressing stays vegan as written—just ensure your Dijon mustard is vegan-friendly. Toasted sunflower seeds make a great crunchy alternative to pine nuts.
Why did my broccoli turn mushy instead of crispy?
Mushy broccoli happens when it's overcooked or not cut evenly. For perfect results: Use bite-sized florets (no stems), roast at 425°F for exactly 15-18 minutes, and spread them in a single layer. If your oven runs hot, check at 12 minutes. Pat everything completely dry before roasting—moisture steams the broccoli instead of browning it.
Can I add cooked protein like chicken or shrimp?
Add 1 cup cooked chicken breast or shrimp (chilled) to the salad after roasting the broccoli. For extra flavor, toss the protein in 1 teaspoon lemon juice** and a pinch of salt before adding. The protein will warm slightly when tossed with the dressing but won't overcook. This makes it a complete meal in one bowl.